iOS 14 以降の UITableViewCell のレイアウト(カスタムセル非使用)
はじめに
テーブルビューでは、カスタムセルを作成しなくてもデフォルトで提供されている 4 種類のスタイルが利用できました。
| IB 上での Style 設定 | 対応する UITableViewCell.CellStyle の定数 |
説明 |
|---|---|---|
| Basic | default |
左端に imageView 、その隣に textLabel |
| Right Detail | value1 |
左端に imageView 、その隣に textLabel、右端に detailTextLabel |
| Left Detail | value2 |
左端に textLabel、またそのすぐ隣に detailTextLabel |
| Subtitle | subtitle |
左端に imageView 、その隣の上段に textLabel、下段に detailTextLabel |
しかし、 iOS 14 では textLabel と detailTextLabel 、そして imageView も deprecated となっています。
その代わりにセルの defaultContentConfiguration() で取得したオブジェクトに設定を行い、それを contentConfiguration プロパティに渡せと書いてあります。
その辺りを、サンプルを書いて確認してみます。
サンプルプロジェクトは、 GitHub に置きました。
検証環境
- macOS 11.0.1 Big Sur
- Xcode 12.2
- iOS 14.2
サンプル
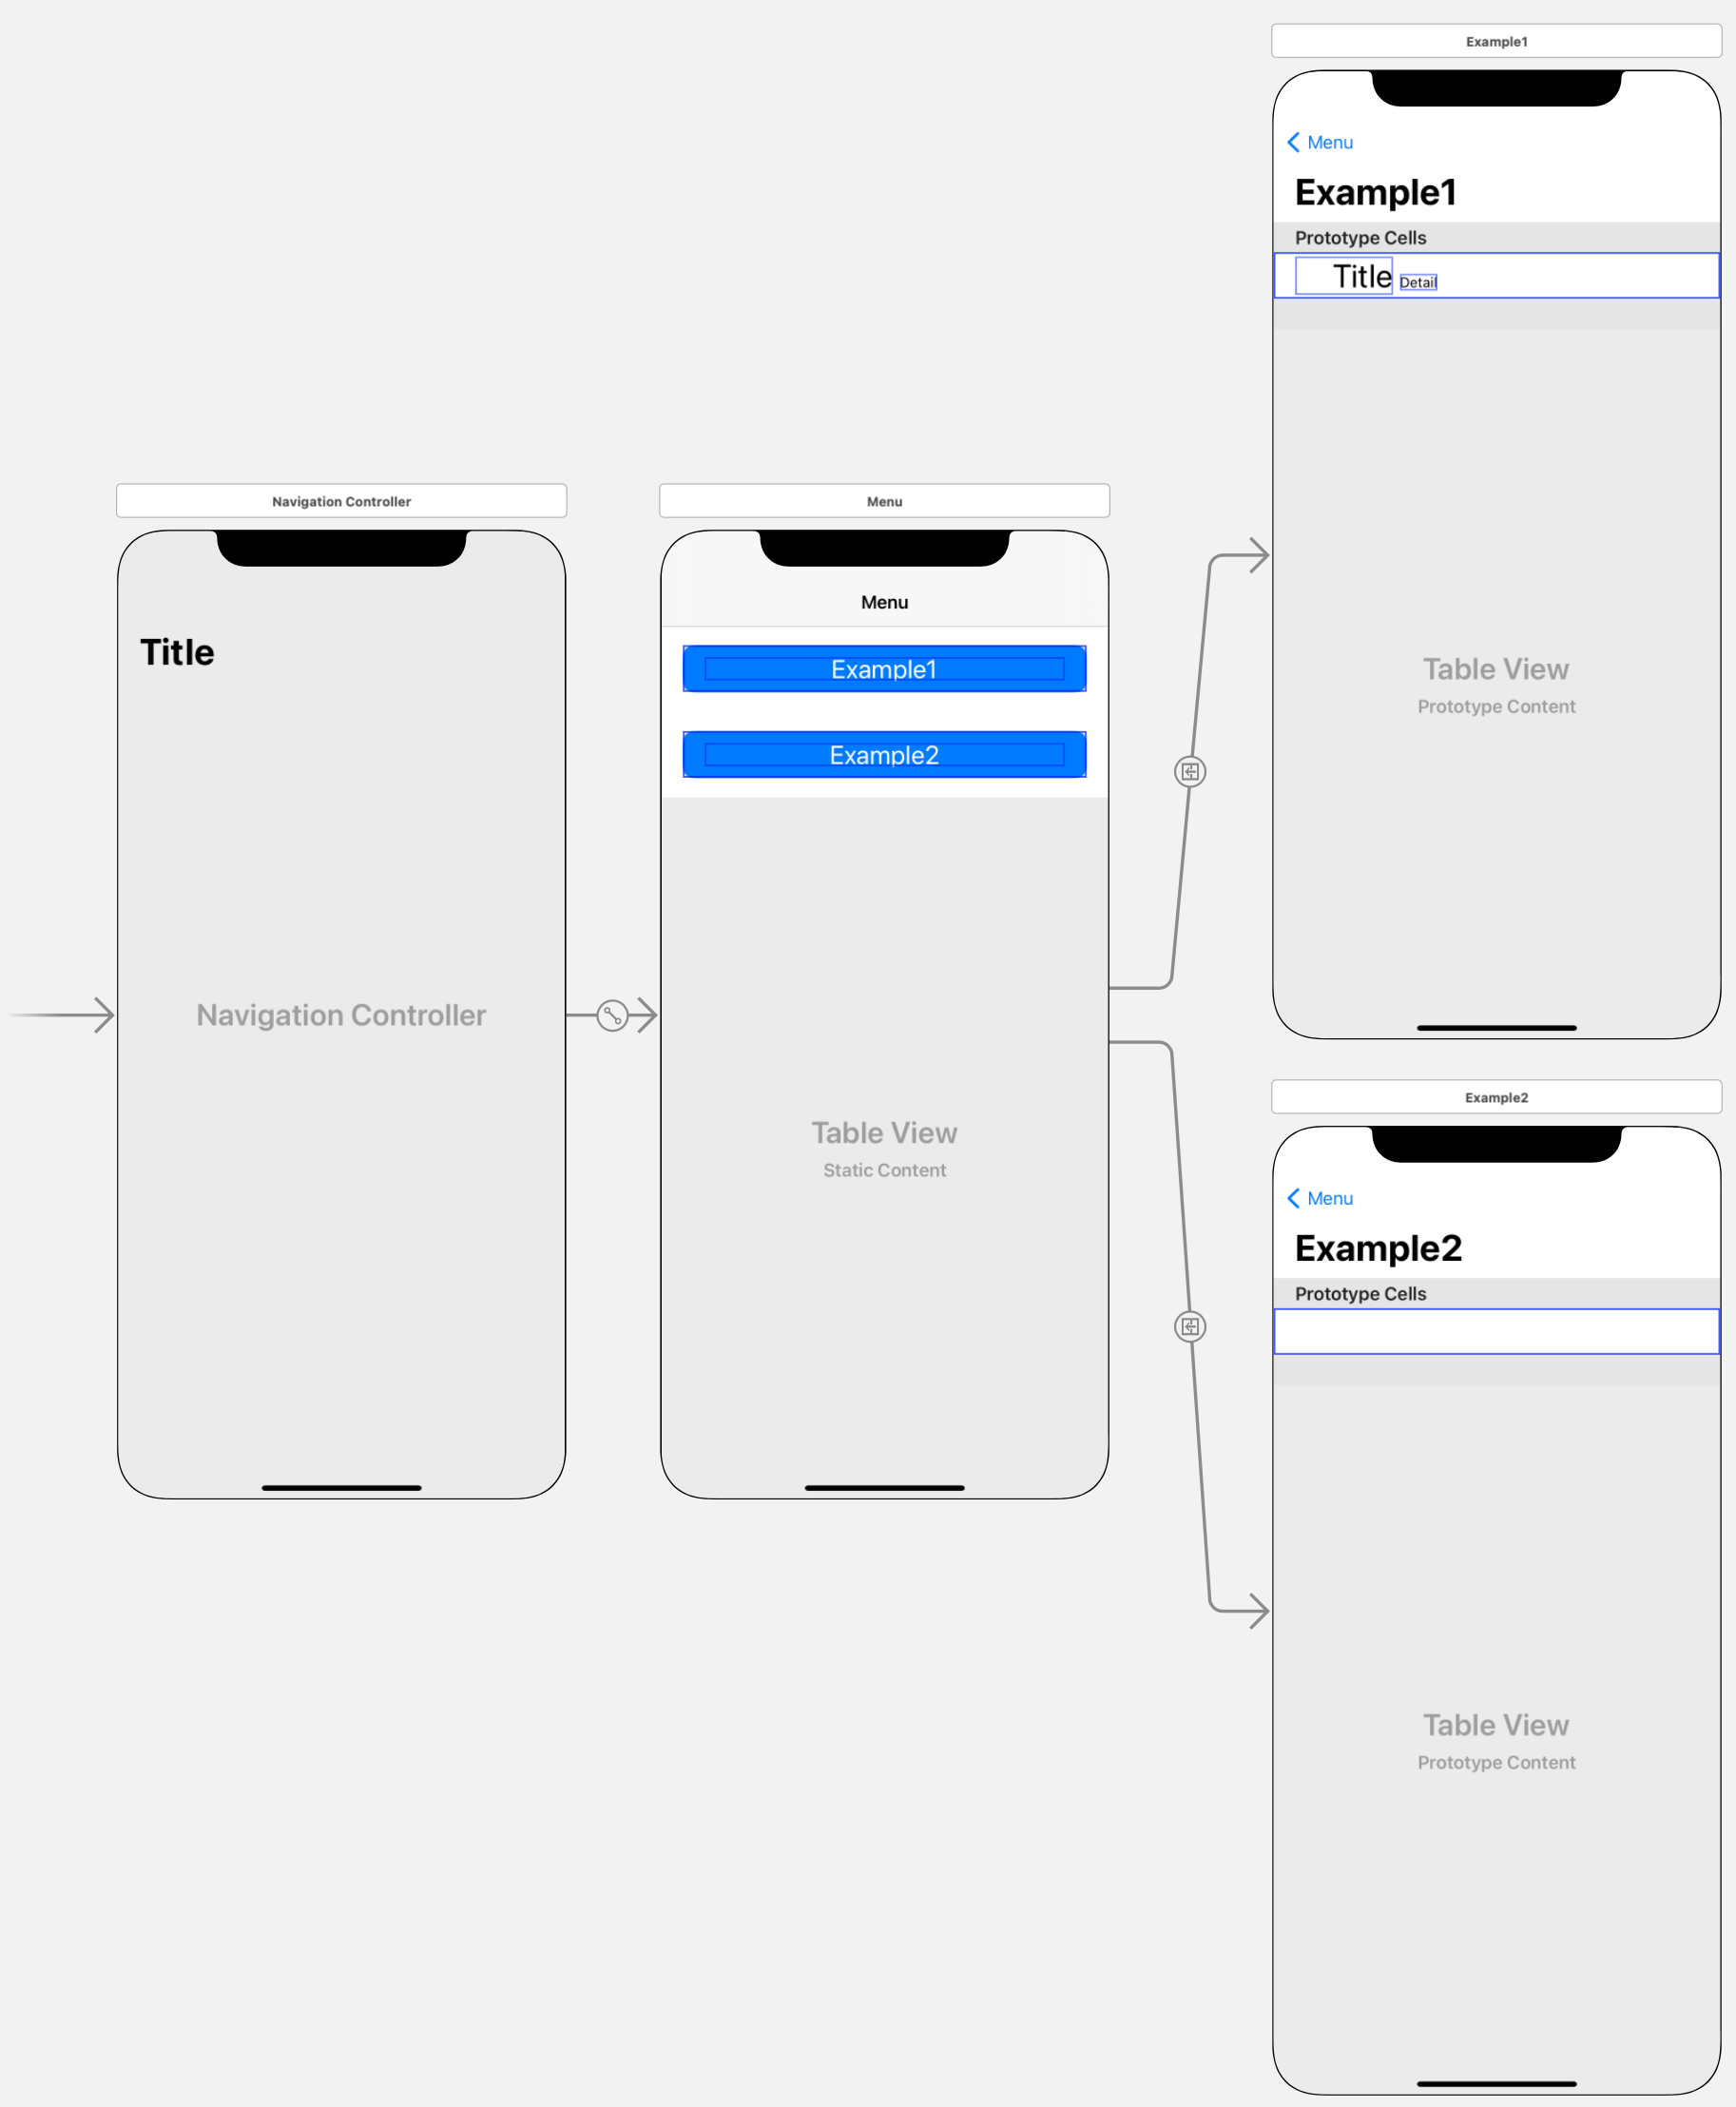
ストーリーボード
Example1 シーンではセルの Style を Left Detail に、 Example2 シーンではセルの Style を Custom に設定しています。
サンプルコード
Example1 シーンのビューコントローラ
セルのスタイルは、 defaultContentConfiguration() によりデフォルトの設定を取得して利用しています。
import UIKit

// Table view controller for Example1 scene
class Example1TableVC: UITableViewController {
    private var items:[(product: String, description: String)] = [
        ("AAA", "aaa aaaaa aaaa"),
        ("BBB", "bbb bbbbb bbbb"),
        ("CCC", "ccc ccccc cccc"),
        ("DDD", "ddd ddddd dddd"),
        ("EEE", "eee eeeee eeee"),
        ("FFF", "fff fffff ffff"),
        ("GGG", "ggg ggggg gggg"),
        ("HHH", "hhh hhhhh hhhh"),
    ]

    override func viewDidLoad() {
        super.viewDidLoad()
    }

    // MARK: - Table view data source

    override func tableView(_ tableView: UITableView, numberOfRowsInSection section: Int) -> Int {
        return items.count
    }

    override func tableView(_ tableView: UITableView, cellForRowAt indexPath: IndexPath) -> UITableViewCell {
        let cell = tableView.dequeueReusableCell(withIdentifier: "Ex1Cell", for: indexPath)

        // Use default settings
        var content = cell.defaultContentConfiguration()

        #if DEBUG
        print(content)
        #endif

        content.text = items[indexPath.row].product
        content.secondaryText = items[indexPath.row].description
        content.image = UIImage(systemName: "appletv")

        // Set content
        cell.contentConfiguration = content

        return cell
    }
}
Example2 シーンのビューコントローラ
セルのスタイルは、奇数行には UIListContentConfiguration.valueCell() を、偶数行には UIListContentConfiguration.subtitleCell() を利用しています。
import UIKit

// Table view controller for Example2 scene
class Example2TableVC: UITableViewController {
    private var contents: [UIListContentConfiguration] = [
        {
            var content: UIListContentConfiguration = .valueCell()
            content.textProperties.font = .systemFont(ofSize: 20, weight: .heavy)
            content.textProperties.color = .systemGreen
            content.secondaryTextProperties.font = .monospacedSystemFont(ofSize: 16, weight: .light)
            content.secondaryTextProperties.color = .systemOrange
            content.imageProperties.tintColor = .systemPurple

            return content
        }(),
        {
            var content: UIListContentConfiguration = .subtitleCell()
            content.textProperties.font = .systemFont(ofSize: 20, weight: .heavy)
            content.textProperties.color = .systemBlue
            content.secondaryTextProperties.font = .systemFont(ofSize: 16, weight: .light)
            content.secondaryTextProperties.color = .systemTeal
            content.imageProperties.tintColor = .systemRed

            return content
        }()
    ]

    private var items:[(product: String, description: String)] = [
        ("AAA", "aaa aaaaa aaaa"),
        ("BBB", "bbb bbbbb bbbb"),
        ("CCC", "ccc ccccc cccc"),
        ("DDD", "ddd ddddd dddd"),
        ("EEE", "eee eeeee eeee"),
        ("FFF", "fff fffff ffff"),
        ("GGG", "ggg ggggg gggg"),
        ("HHH", "hhh hhhhh hhhh"),
    ]

    override func viewDidLoad() {
        super.viewDidLoad()
    }

    // MARK: - Table view data source

    override func tableView(_ tableView: UITableView, numberOfRowsInSection section: Int) -> Int {
        return items.count
    }

    override func tableView(_ tableView: UITableView, cellForRowAt indexPath: IndexPath) -> UITableViewCell {
        let cell = tableView.dequeueReusableCell(withIdentifier: "Ex2Cell", for: indexPath)

        // Set different UIListContentConfiguration for odd/even cell
        var content = contents[indexPath.row % 2]

        #if DEBUG
        print(content)
        #endif

        content.text = items[indexPath.row].product
        content.secondaryText = items[indexPath.row].description
        content.image = UIImage(systemName: "iphone")

        // Set content
        cell.contentConfiguration = content

        return cell
    }
}
実行結果
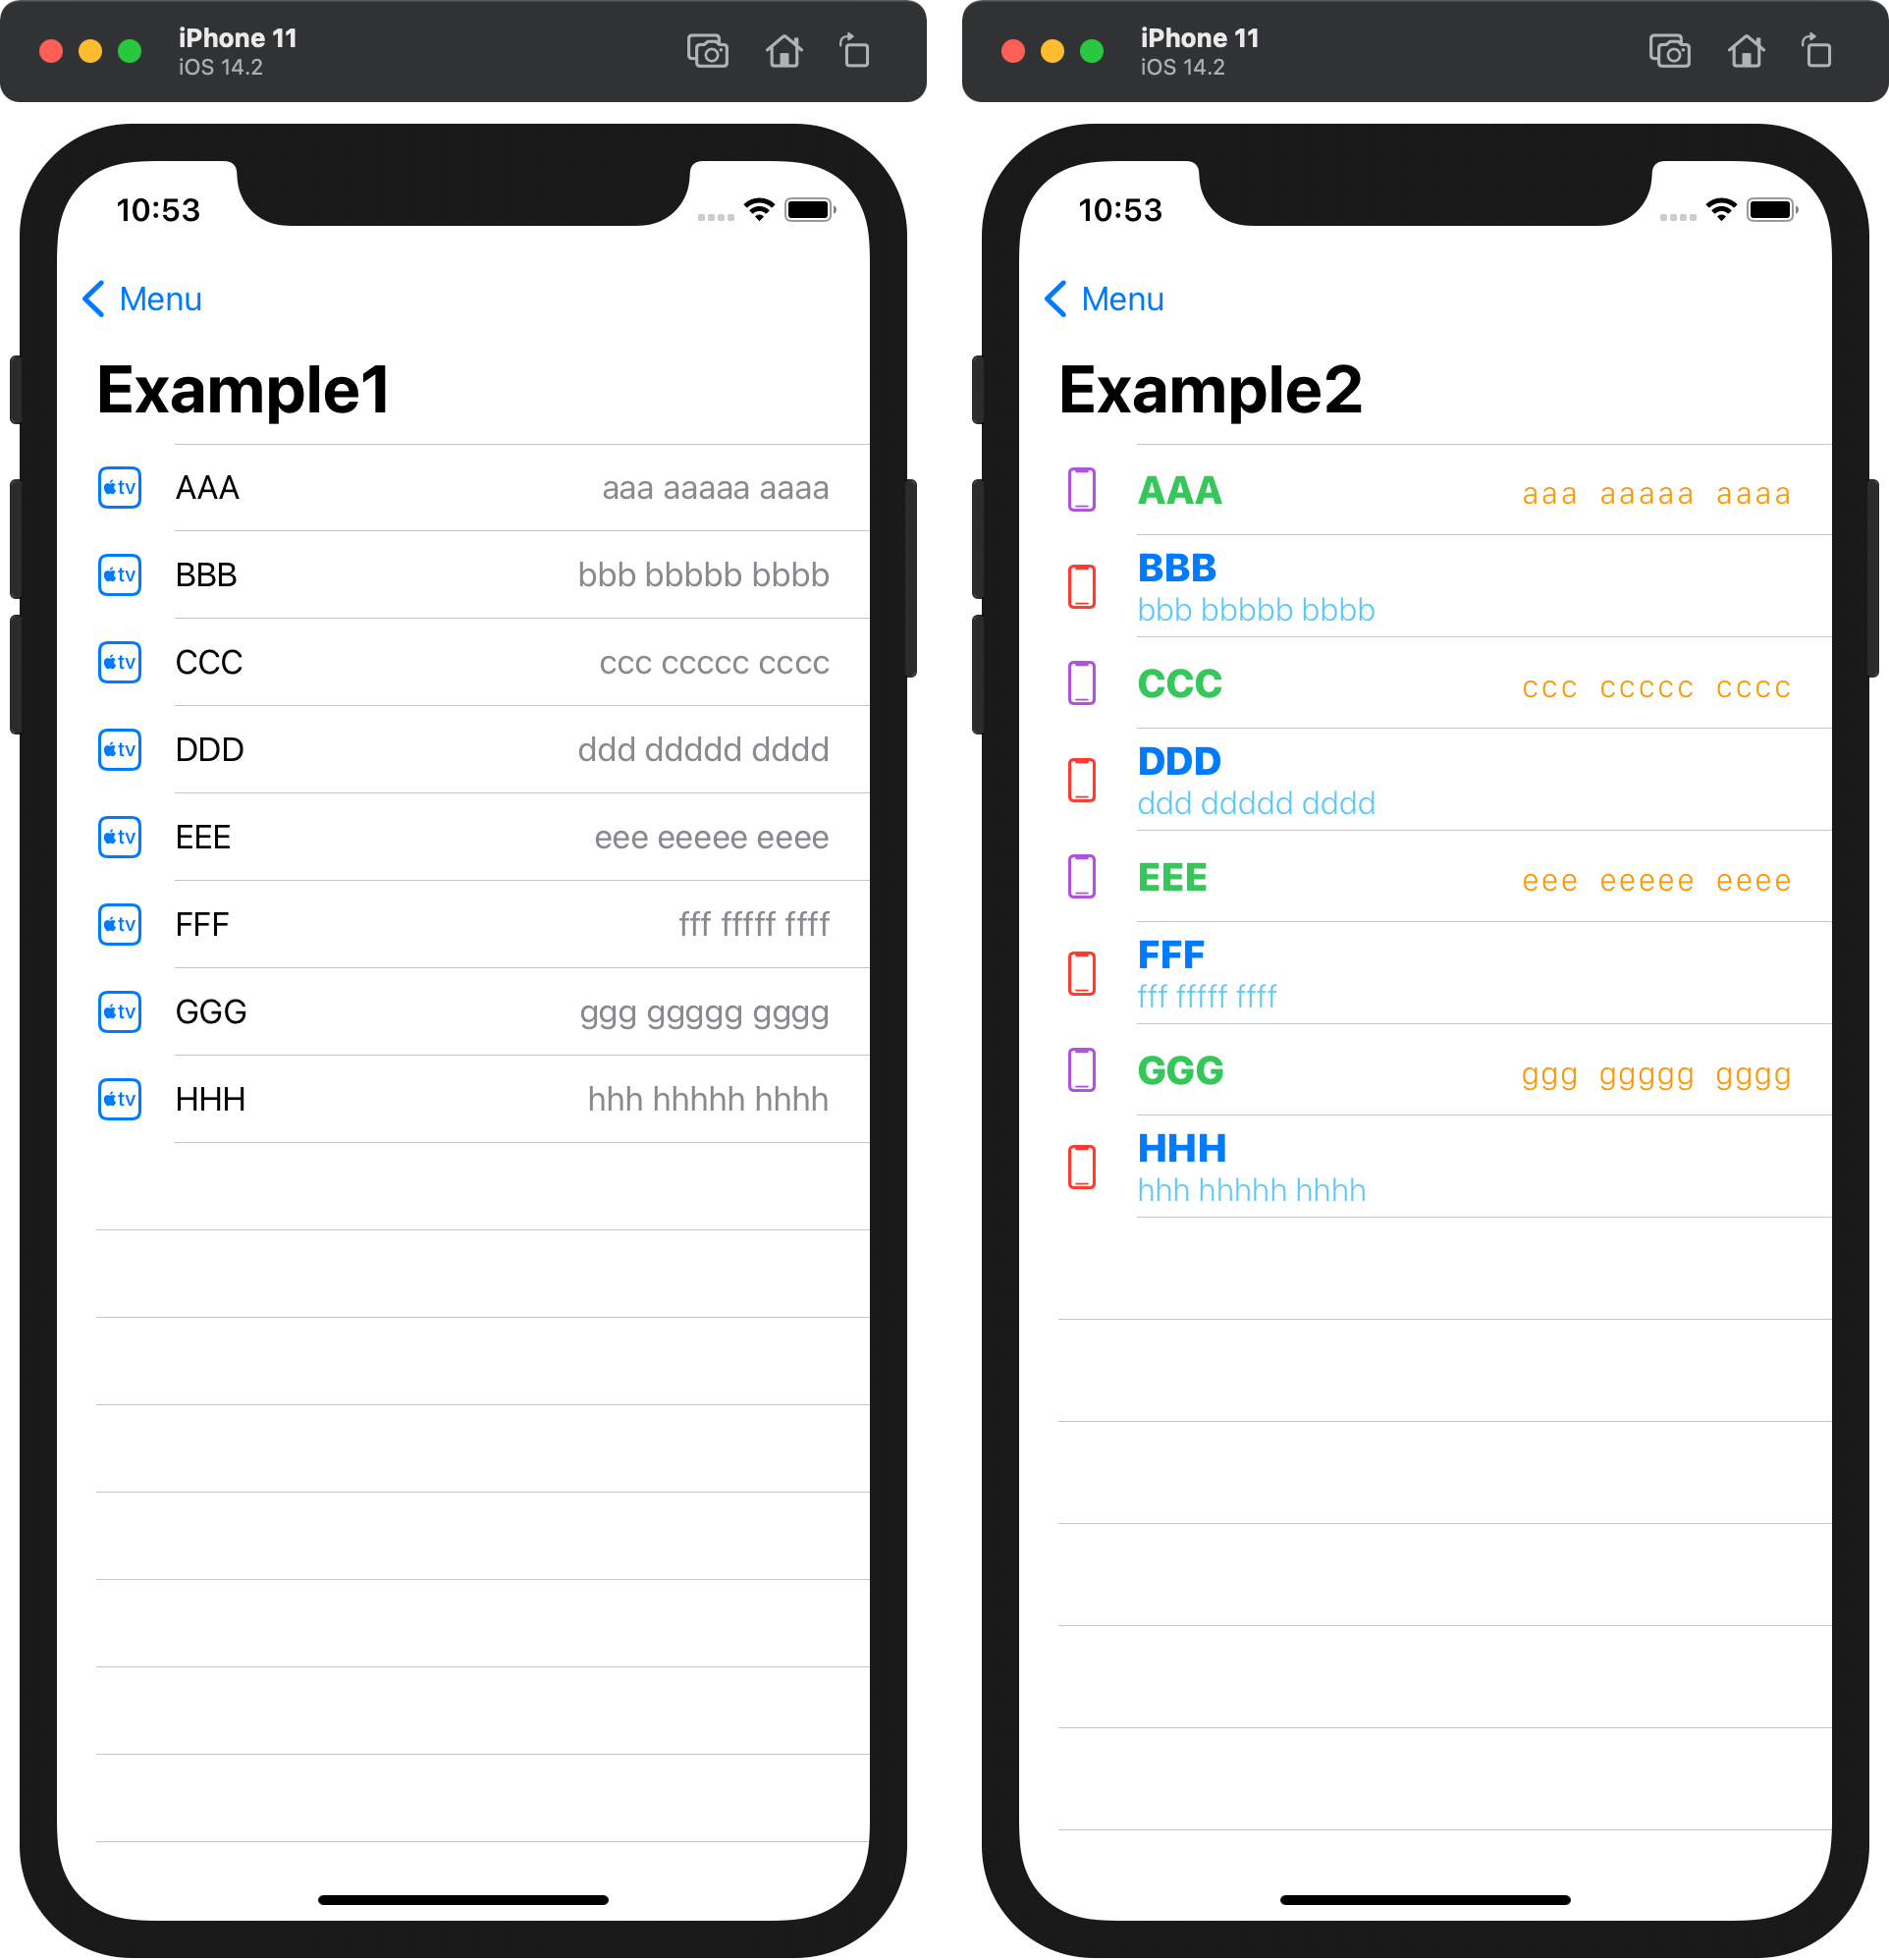
Example1 シーンでは、 Left Detail を指定したにもかかわらず Right Detail 相当の表示となっています。また、フォントサイズなども IB 上の設定とは異なります。 Example2 シーンでは、奇数行/偶数行で別々の設定が適用できています。
InterfaceBuilder 上の Style 設定はどうなるの?
IB 上で Style を指定してもそのレイアウトになるとは限りません。実際に試してみたところ IB 上で設定した Style は、 UIListContentConfiguration では以下にマッピングされていました。
| IB 上での Style 設定 | UIListContentConfiguration の Base Style |
備考 |
|---|---|---|
| Custom | Cell |
見た目は Subtitle 相当 |
| Basic | Cell |
見た目は Subtitle 相当 |
| Right Detail | Value Cell |
見た目はそのまま Right Detail 相当 |
| Left Detail | Value Cell |
見た目は Right Detail 相当 |
| Subtitle | Subtitle Cell |
見た目はそのまま Subtitle 相当 |
Right Detail と Subtitle 以外は IB 上の見た目と実行時のレイアウトが異なるので注意が必要です。なお、 Right Detail, Subtitle でも、 IB 上で設定したフォントサイズなどは反映されません。
あくまでも、セルのレイアウトはプログラム上でセルの contentConfiguration プロパティに対して設定する必要がありそうですね。