iOSにおけるPush通知の基本1(通知の受信まで)
iOSにおけるPush通知の基本1(通知の受信まで)
はじめに
- Push通知は、使い方によっては非常に効果的です
- 通知しすぎると、邪魔になってしまいますが
- ここでは、Push通知の基本的な実装方法を説明します
- Push通知の実装には、UserNotificationsフレームワークを利用します
- ローカル通知にも、同じフレームワークを利用します
- 昔と違って、ひとつのフレームワークで両方に対応できていいですね
検証環境
- Xcode 10.2
- iOS 12.2
- Swift 5
- iPod touch 6th generation
必要なもの
- Apple Developer Programのアカウント
- Apple Developerサイト上で、以下の確認・作成が必要なため
- Team ID
- Authentication Key
- Apple Developerサイト上で、以下の確認・作成が必要なため
- APNs(Apple Push Notification Service)に対応した、Push通知を送信するサーバ
- FirebaseとかMicrosoft Azureとか、いろいろなサービスが対応してます
- テストするだけなら、APNsに対応したいろいろなツールがあります
- APNsは、その名のとおりAppleのPush通知サービスです
- Push通知の送信は、必ずこのサービスを経由します
- iPhoneやiPadなどの実デバイス
-
シミュレータではPush通知が利用できないため
-
シミュレータでPush通知の登録をしようとすると、コンソールに以下のようなメッセージが出力されます
Failed to register: Error Domain=NSCocoaErrorDomain Code=3010 "remote notifications are not supported in the simulator"
UserInfo={NSLocalizedDescription=remote notifications are not supported in the simulator}
-
事前準備(Apple Developerサイト上)
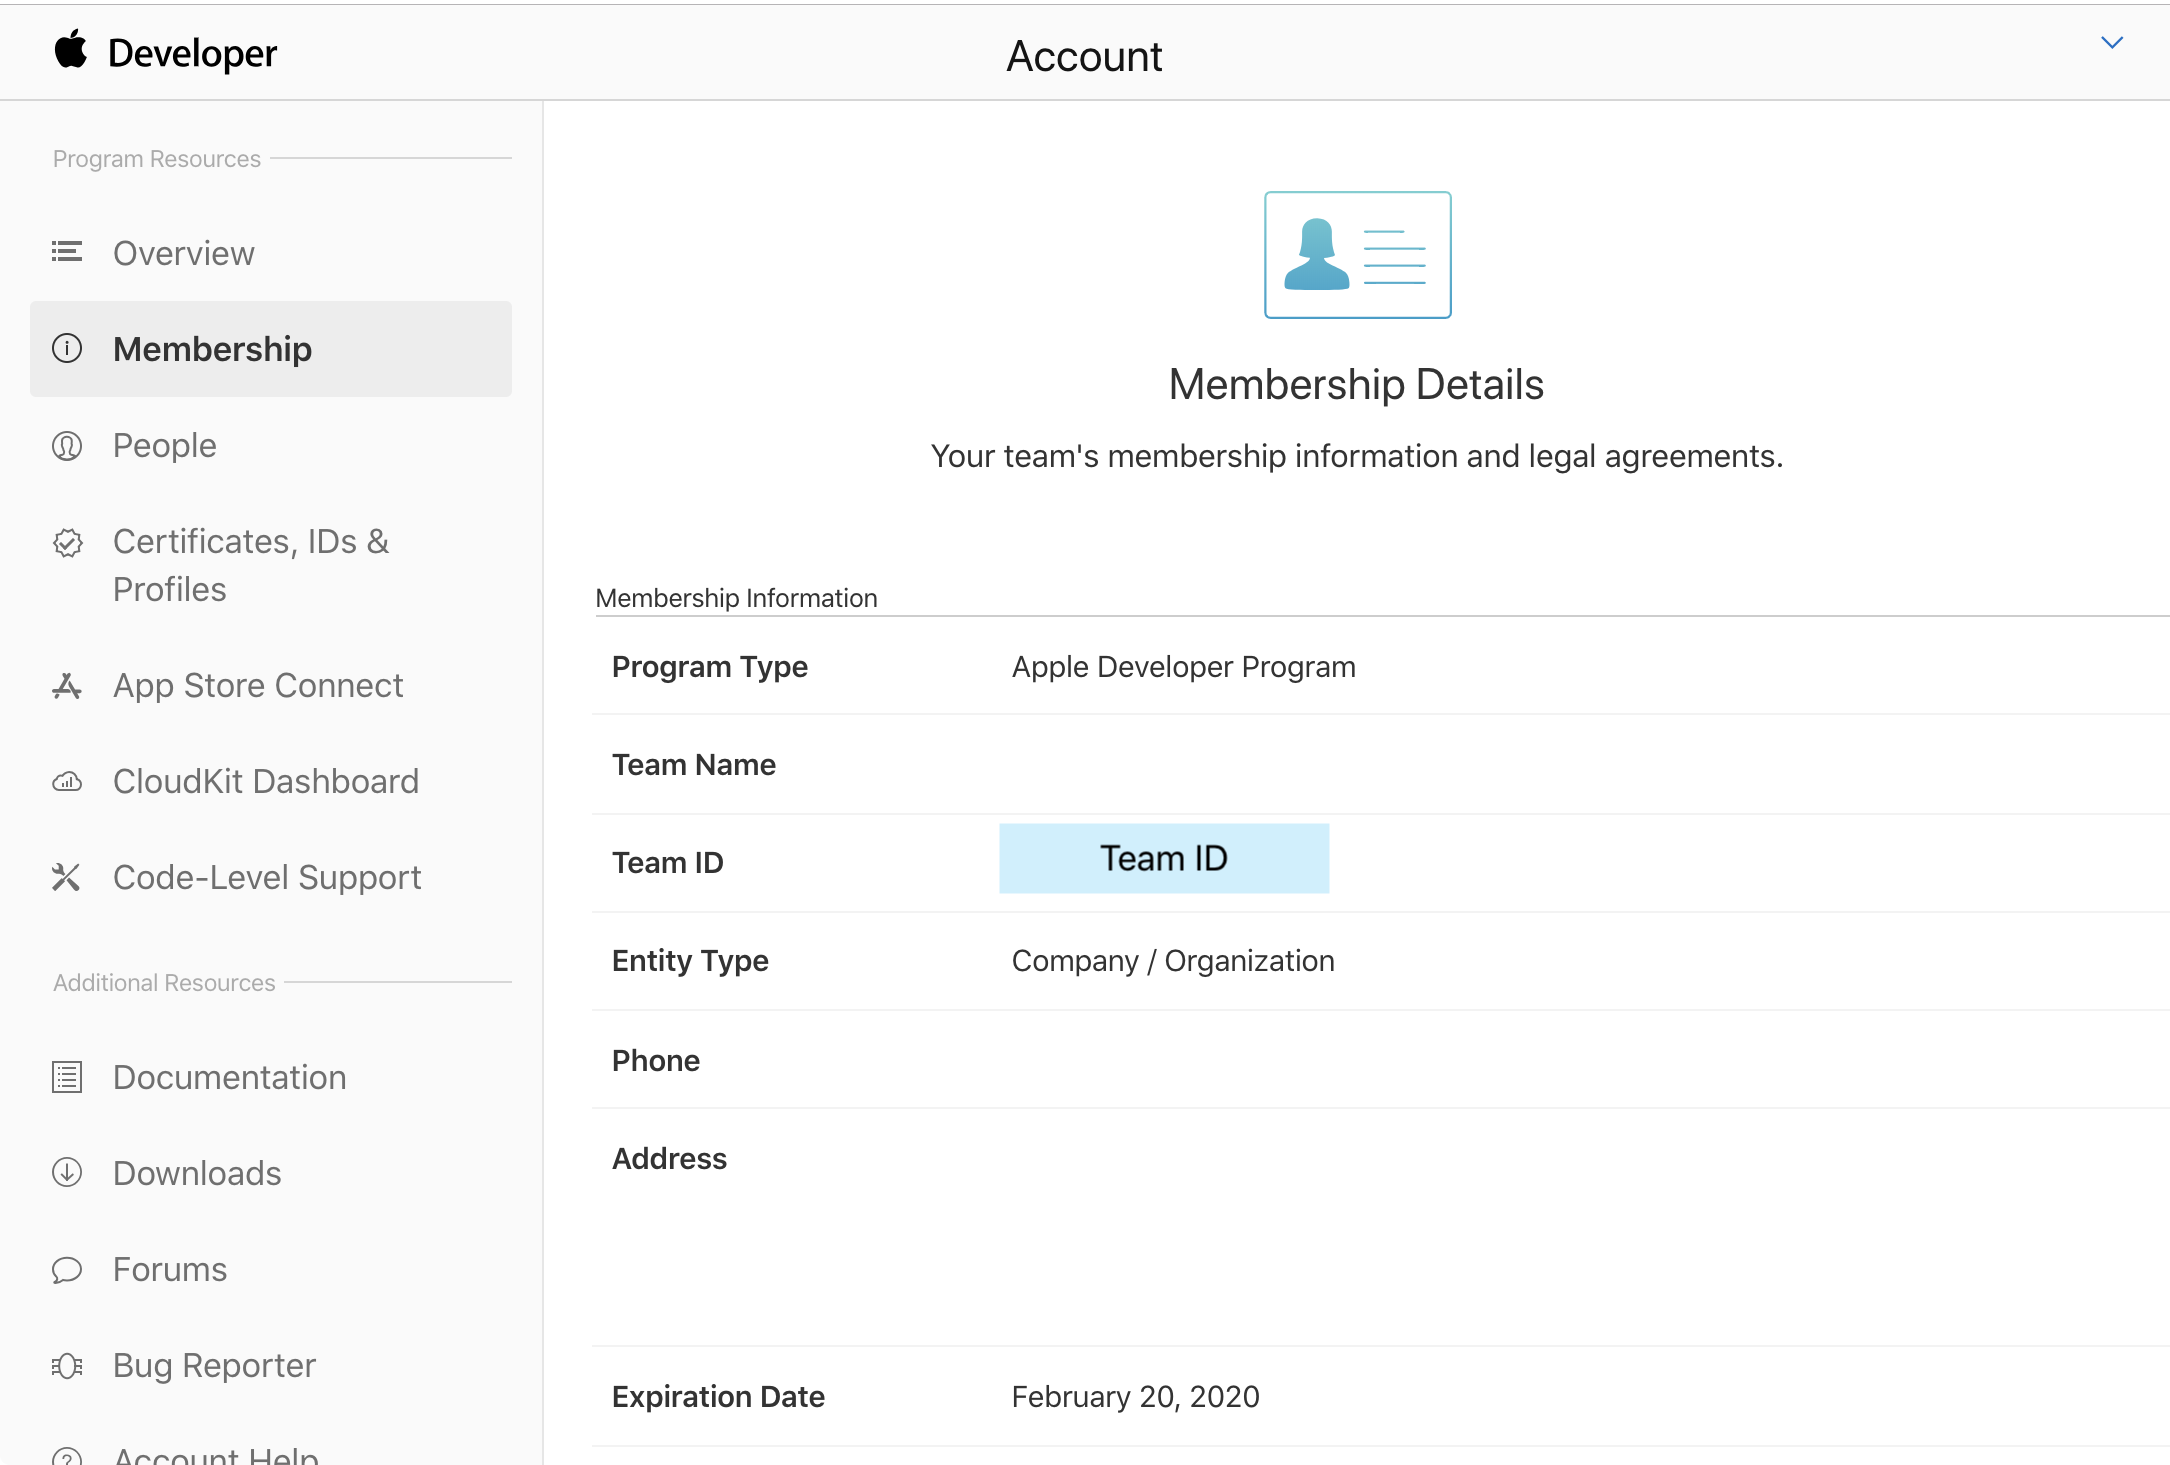
Team IDの確認
-
Apple Developerサイトにログイン
-
左側のMembershipを選択して、Membership Detailsに表示されたTeam IDをメモしておく
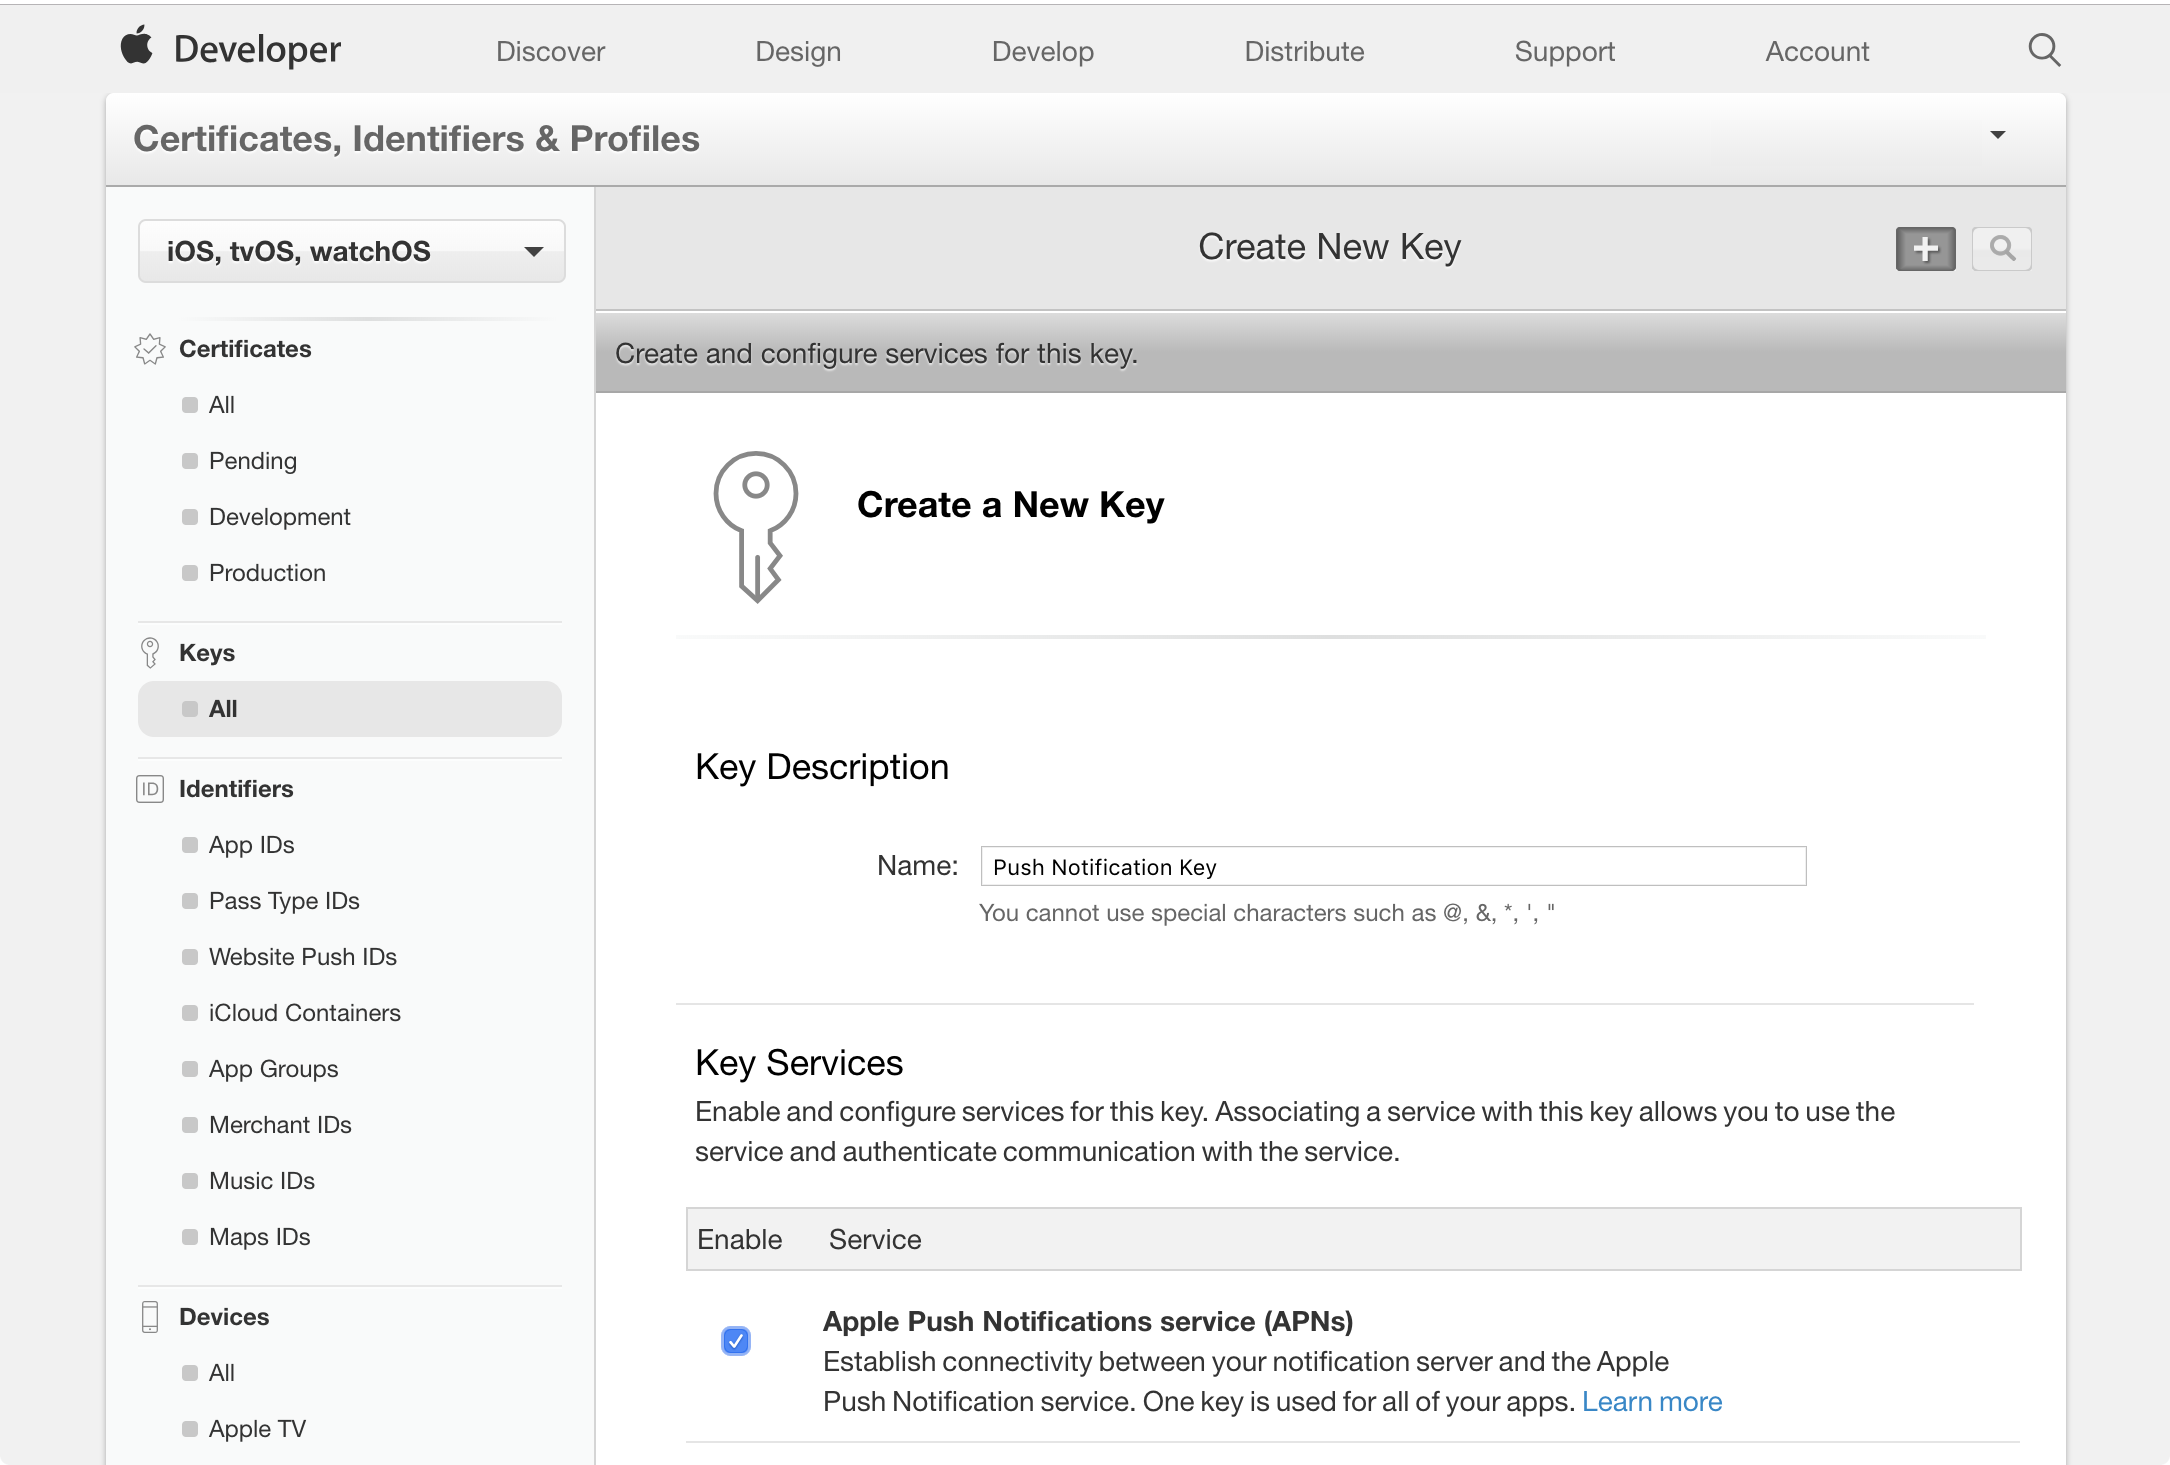
Authentication Keyの作成とダウンロード
-
Apple Developerサイトにログイン
-
左側のCertificates, IDs & Profilesを選択
-
表示された画面で左側のKeysからAllを選択、右上の+をクリックしてキーを作成
- Nameには、キーに設定する任意の名前を入力
- Apple Push Notification service (APNs)にチェック
-
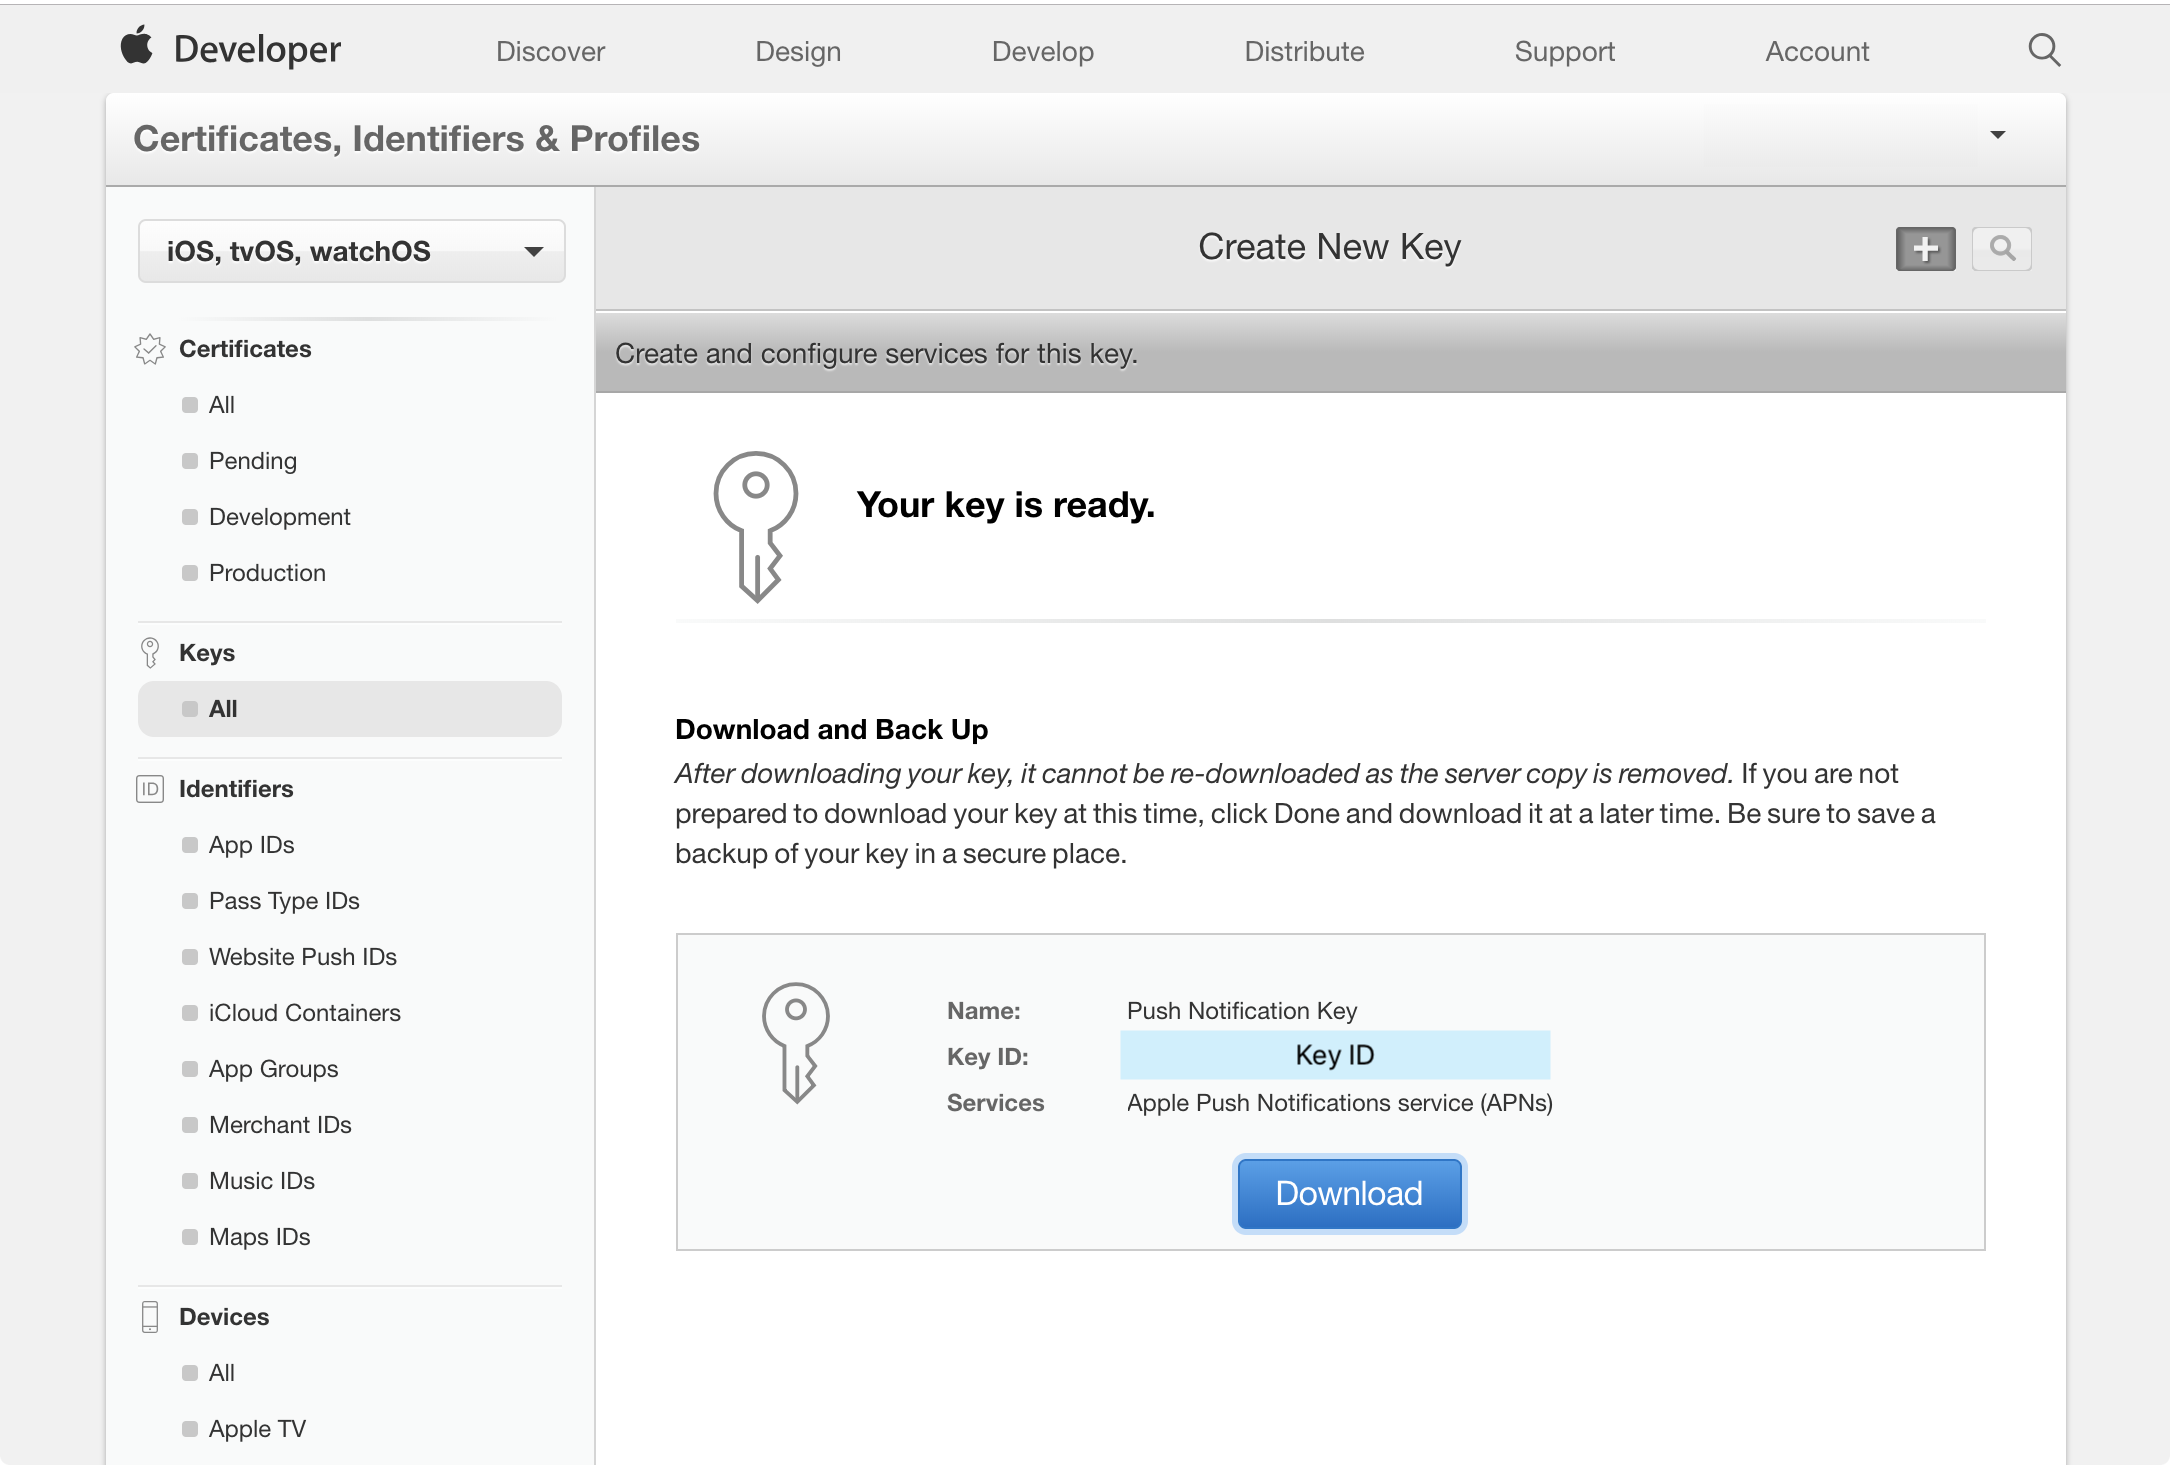
作成したら、Downloadをクリックしてキーをダウンロード
- キーは一度しかダウンロードできません。セキュアな場所に確実に保存してください
- このキーは、Push通知を行うサーバに設定する
- キーは、
AuthKey_XXXXXXXXXX.p8という名前でダウンロードされる XXXXXXXXXXの部分がKey ID- Key IDもメモしておく
主なコンポーネント
| コンポーネント | 説明 |
|---|---|
| UNUserNotificationCenter | 通知関連の機能を管理する |
| UNNotificationRequest | 通知の内容や、配送のトリガーを内包する |
| UNNotificationAction | 通知内で表示されるボタン |
| UNNotificationCategory | 通知の方法や表示されるアクションの設定をまとめたもの |
| UNNotificationSettings | 通知の設定情報を保持 |
| UNMutableNotificationContent | 通知する内容 |
| UNPushNotificationTrigger | APNsから送信された通知に関するトリガー |
実装手順
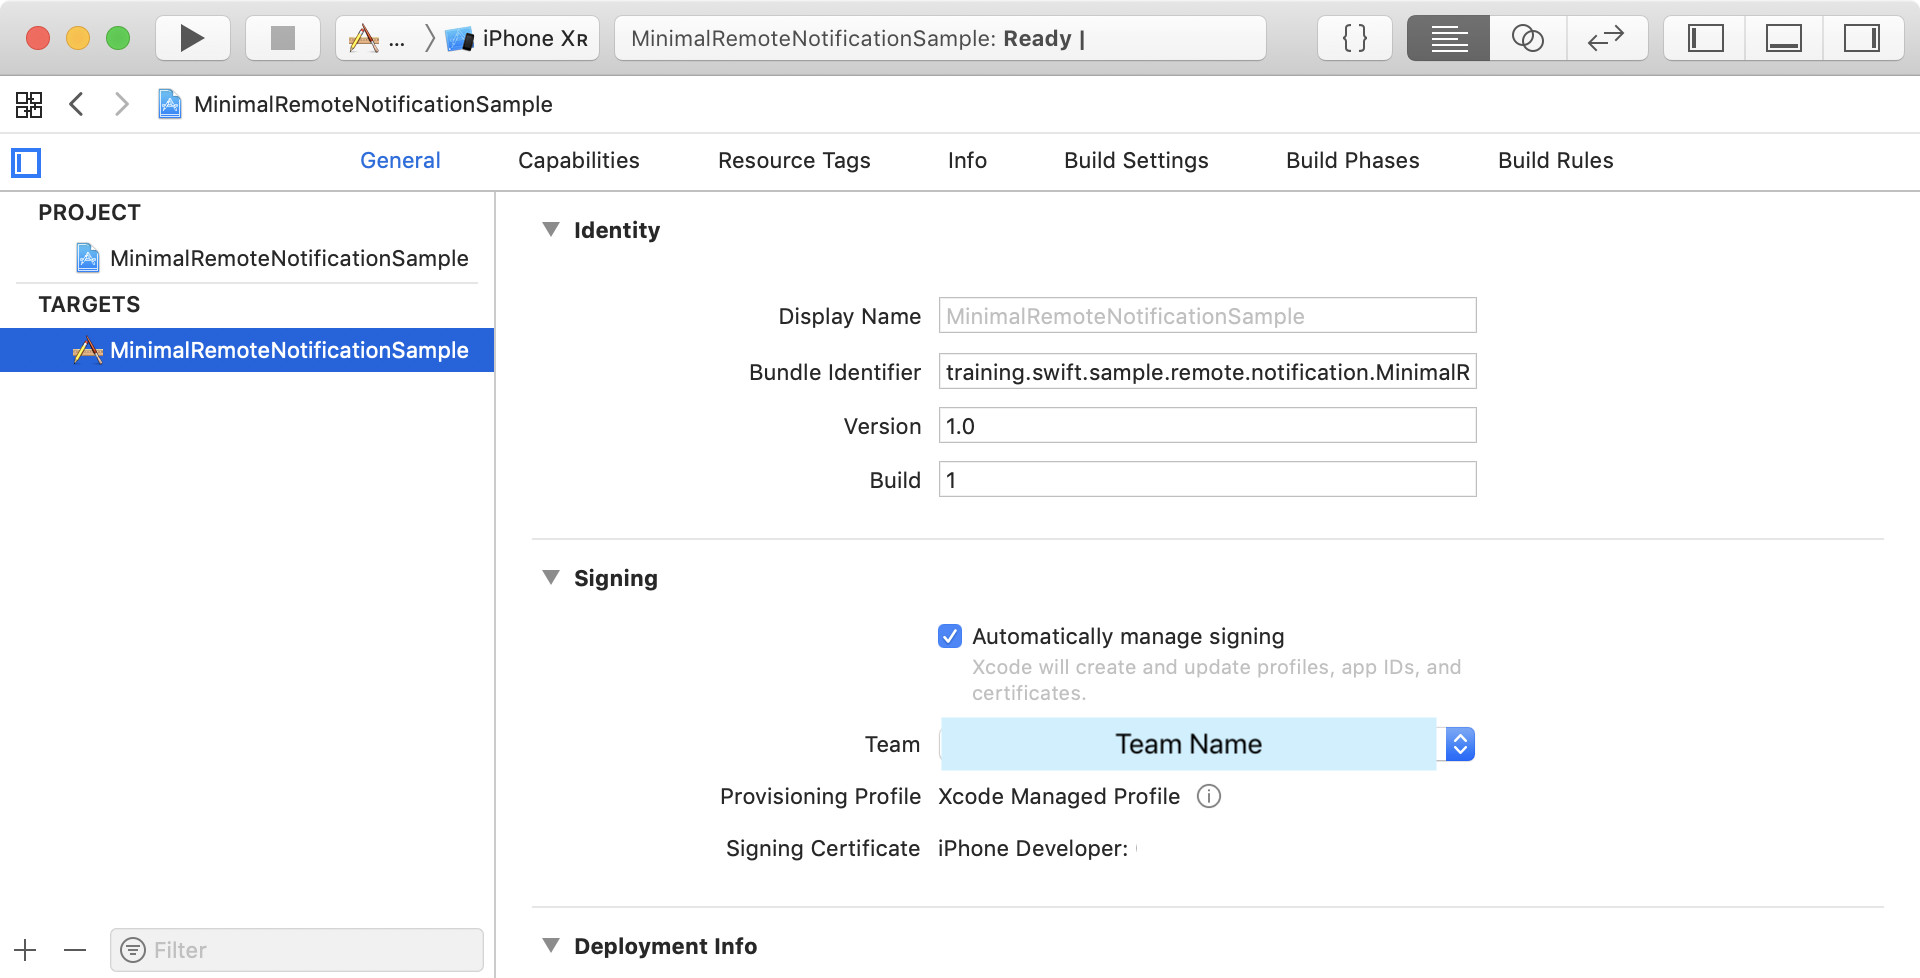
プロジェクトの設定
-
アプリケーションTARGETのSigningから、Teamを選択
- Apple Developer Programに登録済みのアカウントに紐付いている必要性あり
- 無料アカウントのTeamでは、Push Notificationが利用できない
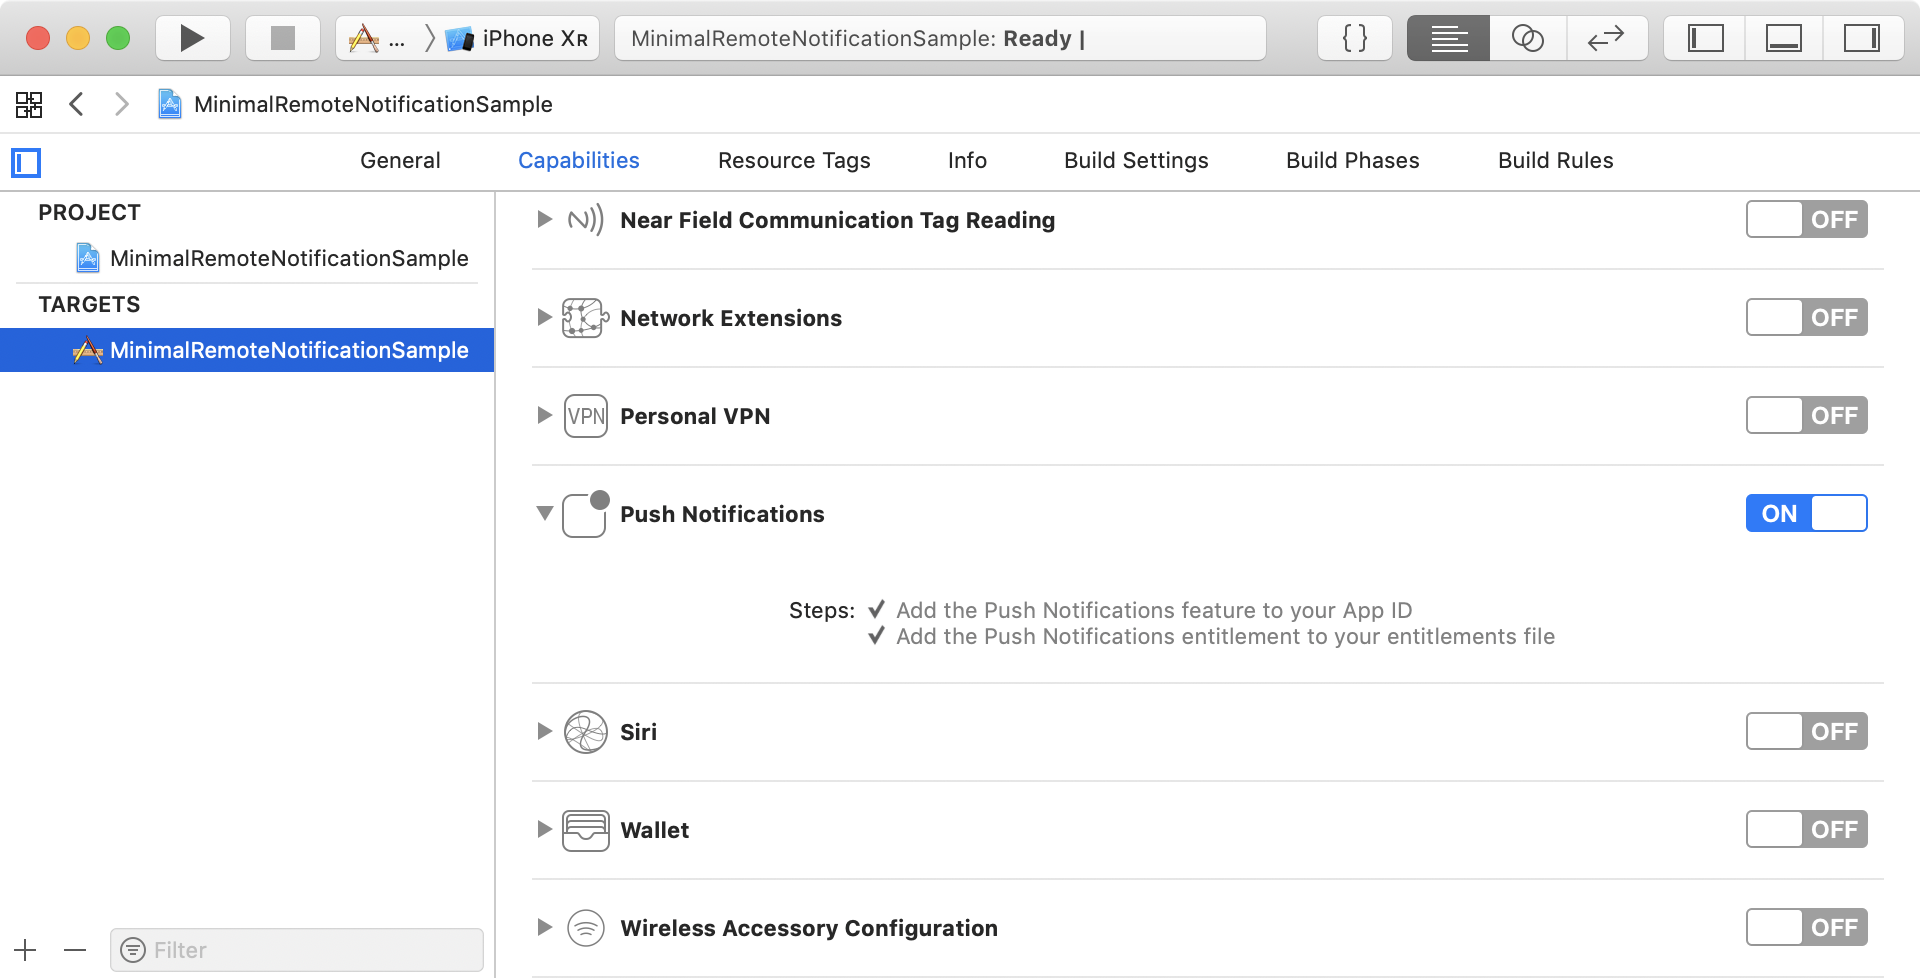
-
アプリケーションTARGETのCapabilitiesから、Push NotificationsをONにする
プッシュ通知の登録
- ここから先は、すべてAppDelegate.swift内に記述します
- アプリの起動時に処理するのと、
UIApplicationDelegateのコールバックが必要になるためです
- アプリの起動時に処理するのと、
-
UserNotificationsフレームワークを利用するので、インポート
import UserNotifications // MARK: 01. import -
ユーザに対して、通知の許可依頼を行う
func application(_ application: UIApplication, didFinishLaunchingWithOptions launchOptions: [UIApplication.LaunchOptionsKey: Any]?) -> Bool { // MARK: 02. request to user UNUserNotificationCenter.current().requestAuthorization(options: [.alert, .sound, .badge]) { granted, error in guard granted else { return } // 〜省略〜 } return true } -
ユーザが通知を許可していた場合は、APNsへ登録
-
**「どのデバイスにインストールされたどのアプリか」**を登録する
-
これにより、APNsは対象を特定して通知を発行できるようになる
-
この結果として、一意に識別するトークンが返される
// MARK: 02. request to user
UNUserNotificationCenter.current().requestAuthorization(options: [.alert, .sound, .badge]) { granted, error in
    guard granted else { return }

    // MARK: 03. register to APNs
    DispatchQueue.main.async {
        UIApplication.shared.registerForRemoteNotifications()
    }
}
-
-
APNsへの登録後に呼び出されるコールバックを実装(
UIApplicationDelegateのメソッド)- 成功時:
application(_:didRegisterForRemoteNotificationsWithDeviceToken:)- 先述したトークンは第2引数に渡される
- このトークンを、Push通知を送信するサービスに登録する必要がある
- 今回はテストとしてmacOS上のプログラムからPush通知を送信するので、トークンをログ出力しておく
- 外部のサービスへトークンを登録する方法は、各サービスのドキュメントを参照してください
- 失敗時:
application(_:didFailToRegisterForRemoteNotificationsWithError:)
// MARK: - Callback for Remote Notification extension AppDelegate { // MARK: 04-1. succeeded to register to APNs func application(_ application: UIApplication, didRegisterForRemoteNotificationsWithDeviceToken deviceToken: Data) { // Data -> Token string let tokenBytes = deviceToken.map { (byte: UInt8) in String(format: "%02.2hhx", byte) } print("Device token: \(tokenBytes.joined())") } // MARK: failed to register to APNs func application(_ application: UIApplication, didFailToRegisterForRemoteNotificationsWithError error: Error) { print("Failed to register to APNs: \(error)") } } - 成功時:
-
アプリを一度実行して通知の受信を許可し、前の手順でログ出力したトークンをメモしておきます
- もちろん、実運用上はこの手順は不要です
- 実際には、
application(_:didRegisterForRemoteNotificationsWithDeviceToken:)内で外部サービスにトークンを登録する処理が必要になります
Device token: b92bf1a8af26237ad8dfad91312ece9563c8493e2bc2bf01e3bd9fb690d20d37
ここまでの実装(AppDelegate.swift)
import UIKit
import UserNotifications    // MARK: 01. import

@UIApplicationMain
class AppDelegate: UIResponder, UIApplicationDelegate {

    var window: UIWindow?

    func application(_ application: UIApplication,
                     didFinishLaunchingWithOptions launchOptions: [UIApplication.LaunchOptionsKey: Any]?) -> Bool {

        // MARK: 02. request to user
        UNUserNotificationCenter.current().requestAuthorization(options: [.alert, .sound, .badge]) { granted, error in
            guard granted else { return }

            // MARK: 03. register to APNs
            DispatchQueue.main.async {
                UIApplication.shared.registerForRemoteNotifications()
            }
        }
        return true
    }
}

// MARK: - Callback for Remote Notification
extension AppDelegate {
    // MARK: 04-1. succeeded to register to APNs
    func application(_ application: UIApplication,
                     didRegisterForRemoteNotificationsWithDeviceToken deviceToken: Data) {
        // Data -> Token string
        let tokenBytes = deviceToken.map { (byte: UInt8) in String(format: "%02.2hhx", byte) }
        print("Device token: \(tokenBytes.joined())")
    }

    // MARK: failed to register to APNs
    func application(_ application: UIApplication,
                     didFailToRegisterForRemoteNotificationsWithError error: Error) {
        print("Failed to register to APNs: \(error)")
    }
}
Push通知の受信テスト
- Push通知が受信できることをテストしてみます
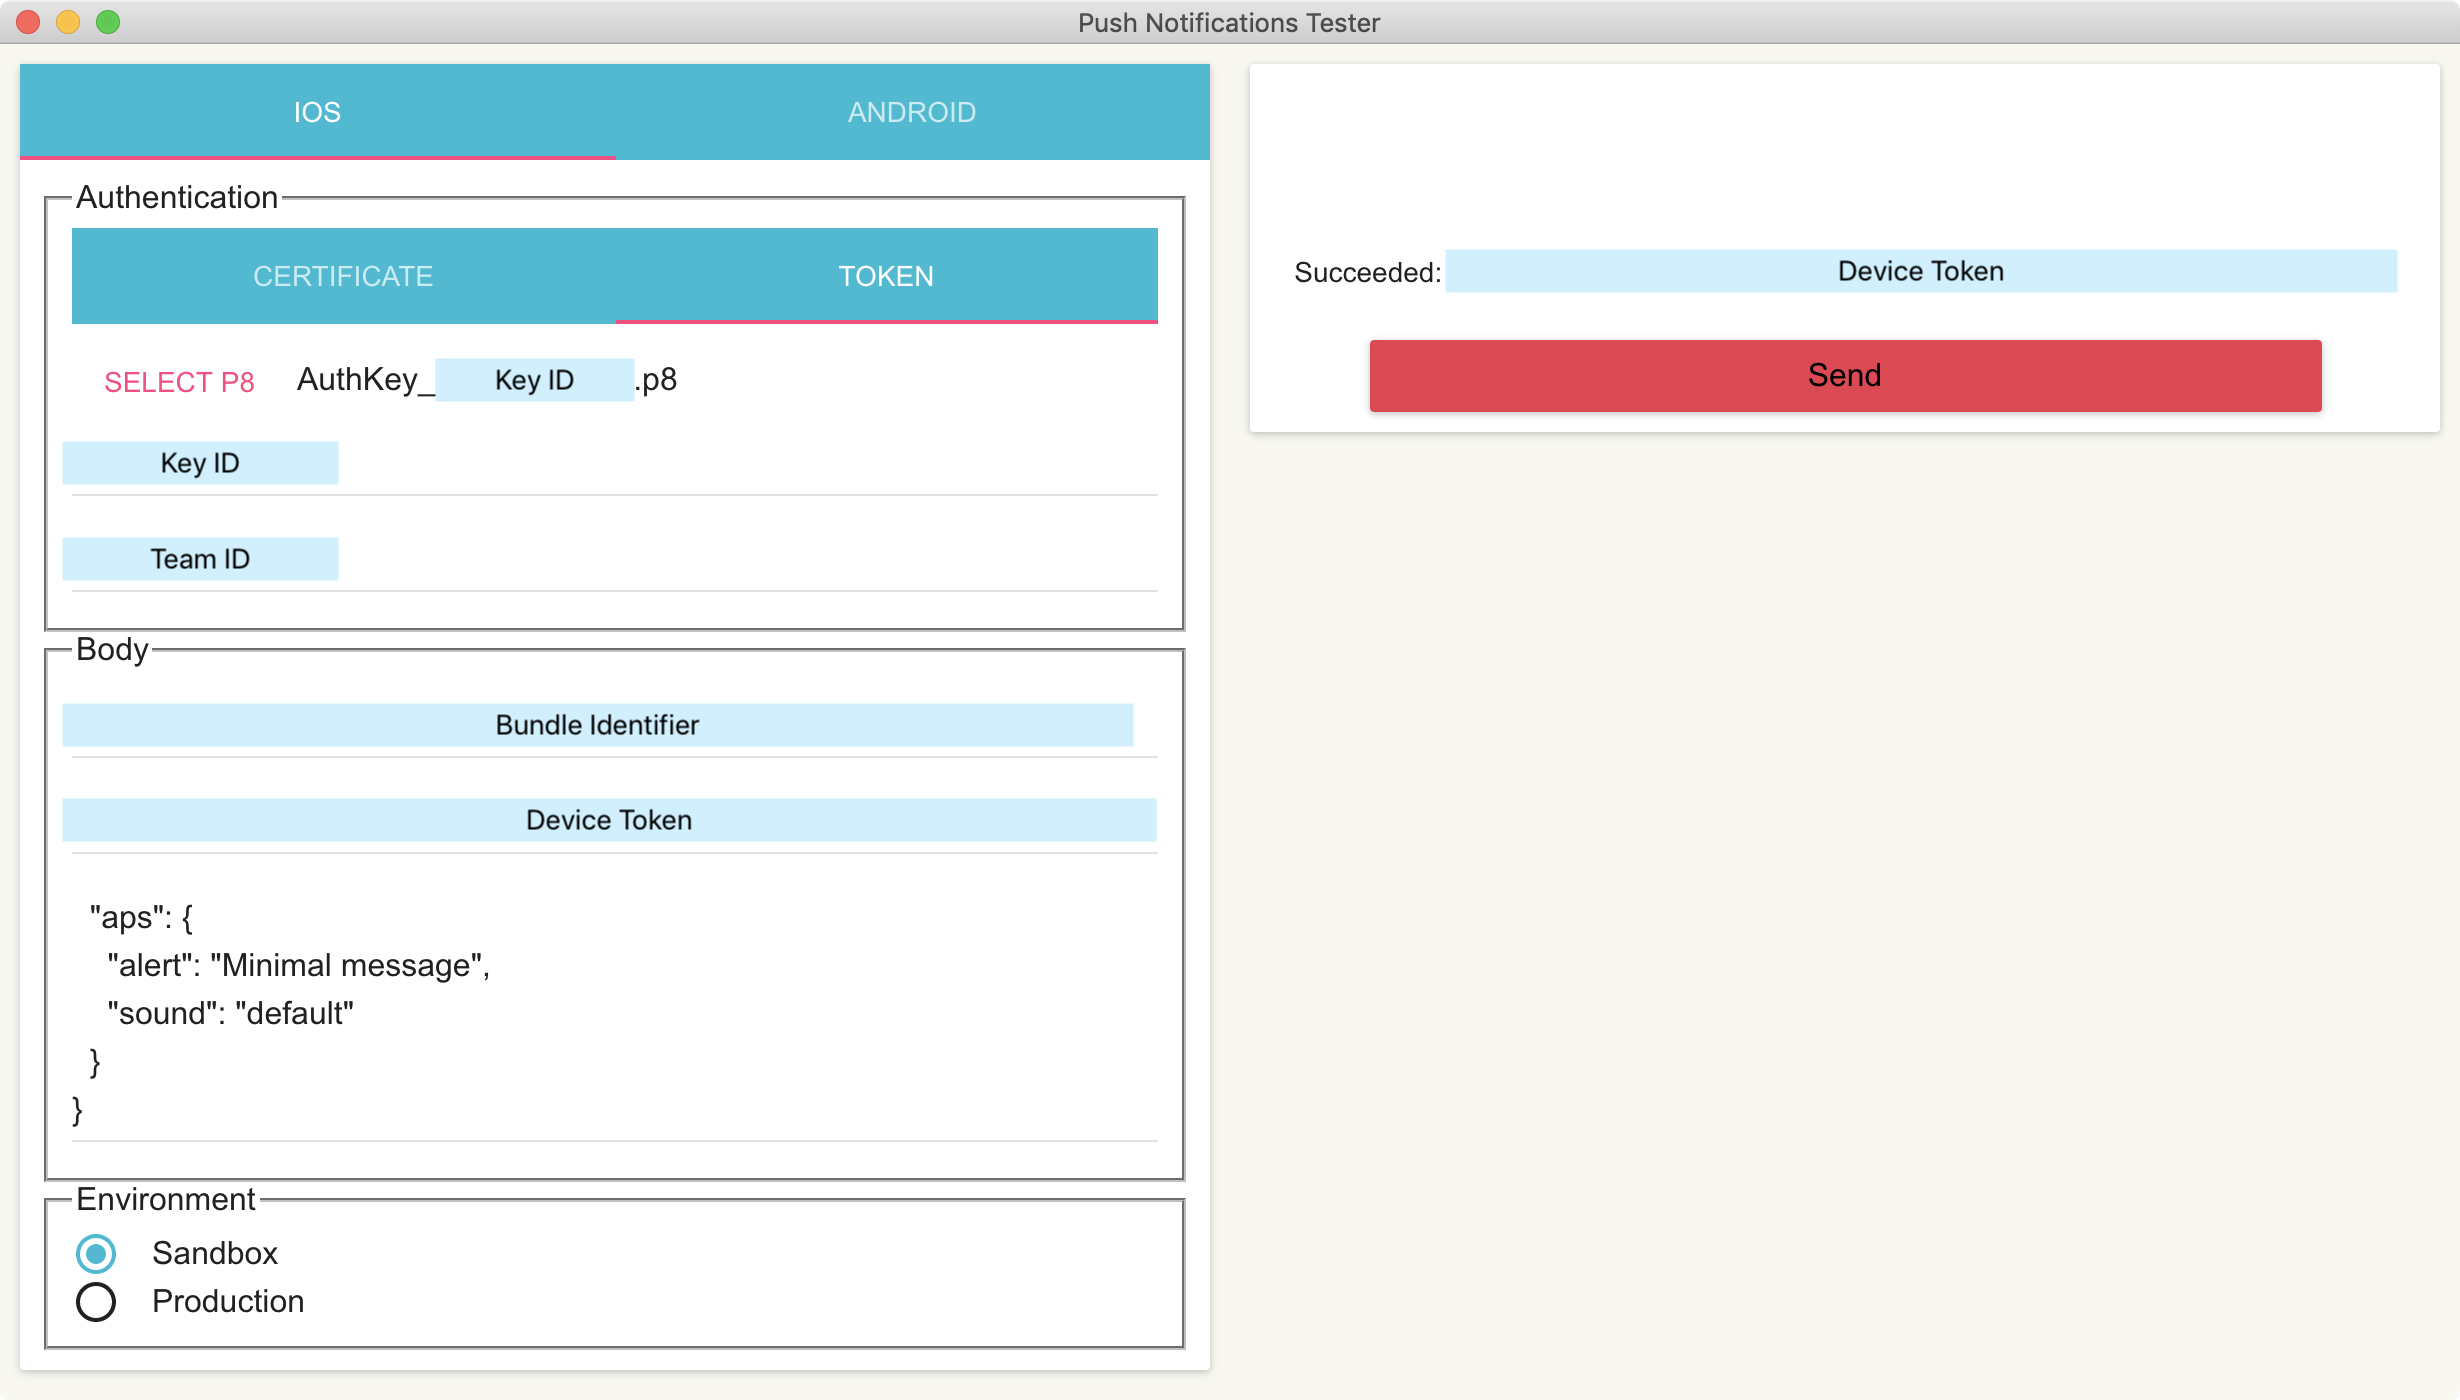
- 今回はonmyway133/PushNotificationsを利用するので、インストールしておいてください
-
Push通知の送信準備(PushNotificationsアプリ)
-
iOSを選択
-
Authentication -> TOKEN
項目 設定値 SELECT P8 ダウンロードしておいたAuthentication Keyを選択 Enter key id メモしておいたKey IDを入力 Enter team id メモしておいたTeam IDを入力 -
Body
項目 設定値 Enter bundle id アプリのBundle Identifierを入力 Enter device token メモしておいたトークンを入力 Enter message Push通知のメッセージとなるJSONを入力 { "aps": { "alert": "Minimal message", "sound": "default" } } -
Environment
- Sandboxにチェック
-
-
Push通知の送信
- Sendボタンをクリックすると、Push通知が送信されます
-
Push通知の受信確認
- 通知は、アプリが表示されていない状態(以下の状態)で受信した場合に表示されます
- アプリが起動していて、Backgroud状態
- アプリが起動していない
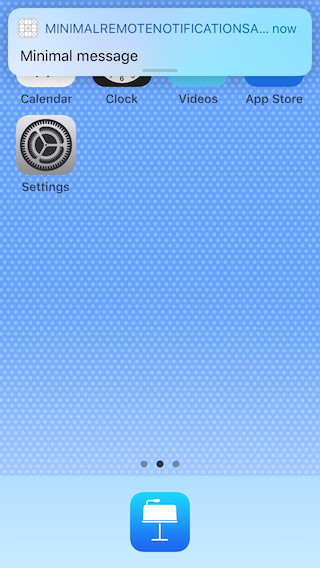
- 通知は、アプリが表示されていない状態(以下の状態)で受信した場合に表示されます
まとめ
- 単純にPush通知を受信して、アプリを開くだけならこれだけの実装で済みます
- また、以下のような実装も可能です
- 通知にボタン(アクション)を追加して、タップした際に処理を実行する
- アプリが起動していない状態でも、アプリを起こしてタスクをバックグラウンドで実行させる
- 通知にはUserNotificationsフレームワークを利用するので、以下の点を除いてローカル通知もほぼ同様の実装で受信できます
- APNsへの登録がない(デバイスの中で完結するため)
- 通知を送信する処理の実装が必要
- 今回作成したサンプルコードは、GitHubに置きました